So you’ve been working with UIKit forever (or at least for a bit) and finally noticed SpriteKit? Well here are just a few tips/tricks that I’ve come across that I thought might be helpful.
The Shift in the Coordinate System
One of the first things you will notice once you get in and start placing things in the scene is that, in the default coordinate system, the Y axis is flipped on SpriteKit. So instead of the Y coord starting at 0 at the top of the screen and getting bigger going down the screen, in SpriteKit(SK) the Y is 0 at the bottom of the screen and goes up as you go up the screen like a graph. This is a little weird if your head has been in UIKit space for a while, but is very natural if you think of the screen not as a pallet, but as a graph that you are plotting images, paths and text on.
All that said you can actually shift the coordinate system as well. By changing the anchorPoint of the SKScene node (or the root node) you can shift where the origin of the scene or view is (please note this is the origin in the scene, not the position of the scene in it’s parent View/View Controller). However, it is important to realize that regardless of any shifts in the coordinate system the size of the scene will be what determines the scale of all nodes inside compared to what you would normally expect (i.e. it will determine if one unit in X is the same as one unit in X for UIKit), so you may want to set the size at runtime based on the device, etc to save yourself some pain.
“However, you can move the scene’s origin by setting its anchorPoint property. The anchor point is specified in the unit coordinate space and chooses a point in the enclosing view.”
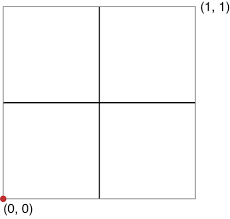
SpriteKit Coordinate System
The Depth in the Layering System
In UIKit, we get very used to positioning in the layering system of the view hierarchy, moving views around in list of the Interface Builder and if you have gotten fancy then you have used ‘bringToFront’, ‘sendToBack’, ‘insertSubview: above/belowSubview:’, etc. These are good, but if we are honest, leave us to a bit of an inexact science.
Initially SpriteKit’s layering is all in the “draw order” or the order that you add the children to the parent, but with SK we get depth. Built into every node is a zPosition, which, the higher it is, the “closer” it is to the user. The good news is that SK uses an orthographic rendering system, so the depth only affects which views are on top of which and not how they look(i.e. the node doesn’t scale up closer to the user and smaller farther from the user).
That said, if you want something similar in UIKit and have not found the QuartzCore framework, please allow me to introduce you. This framework is amazing and has been around for ages. Among a great many other things it adds a zPosition to the layer property of all UIViews, so you can have your Z anywhere.
The Children in the Hierarchy
When using SpriteKit it’s important to remember that, like UIView in UIKit, everything is an SKNode. Even the SKScene that you use as the root node of your scene is at its core a SKNode and then you add children SKNodes to that and then SKNodes to those and so on almost exactly the same as UIViews in UIKit. This is important to remember because a) the order you add those nodes determines the order they are drawn (first added = first drawn in that layer of level of nodes) and b) any change to a parent node’s scale, position or rotation will affect all of its children.
The Hit in the Box
If you are planning on any of your SKNodes interacting with each other or with your user then you will have to set up a hit box for them. This is done by adding a SKPhysicsBody to them. The simplest way to do this is:
Obj-C:
    [node setPhysicsBody:[SKPhysicsBody bodyWithRectangleOfSize:node.frame.size]];
    [node.physicsBody setDynamic:NO];

Swift:
    node?.physicsBody = SKPhysicsBody(rectangleOfSize: node.frame.size)
    node?.physicsBody?.dynamic = false
The setting of the dynamic flag is only if you don’t want this node to be affected by other nodes, forces and fields in the scene (i.e. if you are only doing this so that you can touch the item in question).
Now that you have physics bodies on all the nodes you care about interacting with you could do something like finding if you touched one of the nodes by putting this code in the touchesBegan on the SKScene you have created (default is GameScene if you used the template to create the project):
Obj-C:
    CGPoint touchLocation = [touch locationInNode:self];
    SKPhysicsBody* body = [physicsWorld bodyAtPoint:touchLocation];
    if(body){
      //do something with the node via body.node
    }

Swift:
    var touchLocation = touch.locationInNode(self)
    if let body = physicsWorld.bodyAtPoint(touchLocation) {
        //do something with the node via body.node
    }
The Anchor in the Node
I mentioned the anchorPoint of nodes ealier, but they bear a bit more explaination. For most nodes (other then the root/scene) it defaults to (0.5,0.5) which means the middle of the node will be where the node’s position lines up. By extension, this is also the point the node will rotate around, so keep this in mind when setting up nodes that will be rotated.
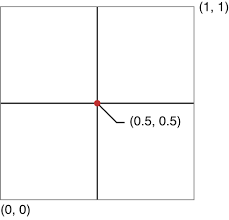
SpriteKit default anchorPoint for most nodes
TL;DR
SpriteKit is a 2D rendering engine that is geared, surprizingly, toward sprites, so it’s best to think of it less like UIKit and more like a game rendering engine.